So I made a quick tutorial for you girls to explain how I did the rose decal from my previous Tattoo inspired design.
Hope this will help you to understand how this method works, and if you still have questions after reading this tutorial, please feel free to ask!
Here we go :)
What you will need to create a stamping decal:
Rubber stamper + scraper
Stamping polish
Nail polish in colors of your choice
Fine nail art brush or toothpicks
Tweezers or a needle
Clear nail polish
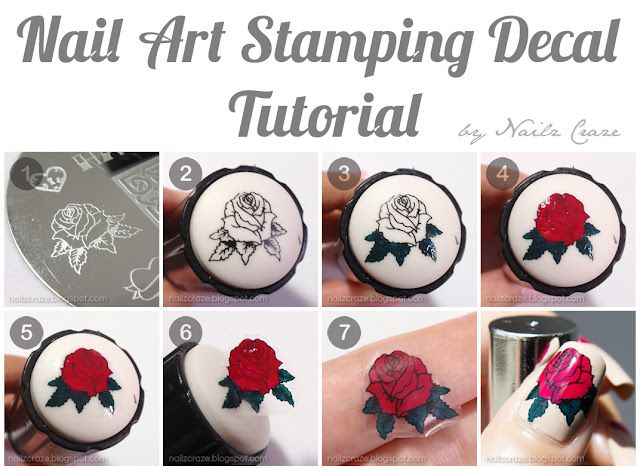
Step 1
Pick a stamping plate with your desired design. Note that if you want to create a colorful decal, you should use a design that has lines that can be filled, like the rose outline for instance.
The plate I used for this is Nailz Craze NC06 Tattoo plate.
Step 2
Transfer the design to a rubber stamper with a stamping polish.
Let the nail polish dry a bit before moving on to the next step.
You can blow on it or wait about a minute.
The polish I used for stamping is Konad Black.
Step 3
With a fine nail art brush, fill the inner lines of the leaves with a green polish.
The polish I used is Barry M Watermelon.
Step 4
Repeat step 3 with the rose itself, this time painting the inner part of the rose with a red nail polish. For larger areas you can use the brush of the nail polish itself, and then fill the delicate areas with the fine nail art brush or a toothpick with small dabbing motions.
The polish I used is Barry M Pomegranate.
Step 5
Wait for the nail polish on the stamper to dry completely, then apply a clear nail polish.
After that, wait a couple of minutes for the decal to dry on the stamper.
I used Poshe Top Coat for this step but any clear nail polish will do the job.
Step 6
Lift the decal from the rubber stamper. You can use tweezers or needle to pick the corner of the nail polish decal, then it will lift easily.
Note that this is a very delicate decal, so be careful when handling it.
Step 7
Your decal is ready for use!
You will notice that it has a bit magnified finish, because it dried on the rubber surface.
When placing the decal on the nail, you want your nail polish (on the nails) to be a bit tacky (a bit sticky, if you touch it with your fingertips it will leave a finger print on it). Place the decal onto the nail, smooth it with your finger or a q tip, and apply a top coat once you are done.
I hope this tutorial was helpful and that you will enjoy using this technique.
Thank you for reading!